)) or an image editor to correct small imperfections in an image,
* preferentially know how to use a command line,
* preferentially have the recommended equipment.
====== About the author ======
Electronic engineer, graduated in 1995 in UFRJ((UFRJ - Universidade Federal do Rio de Janeiro, Brazil - http://www.ufrj.br/)). Have worked for around 15 years with Unix, mainly with FreeBSD but also Solaris, Tru64, Linux and others. Experienced in free and open source software, IT infra-structure, network management, system development and project management. Organized the BSDCon Brazil in 2003, created the “BSD em Revista”, the first magazine dedicated to BSD in Portuguese and the news site http://www.myfreebsd.com.br (not online anymore). Organized and taught in FreeBSD courses. Studied photography at school in 1985. Built amplifiers, tripods, home made cameras and so on. Make panoramic pictures since 2002 and got specialized in 2010. Keep a blog of immersive pictures((My 360 pictures blog - http://cartola.org/360)) and the first open forum in Portuguese, the Panoforum((Panoforum - the first open forum in portuguese dedicated to panoramic photography - http://www.panoforum.com.br/)).
====== A General View ======
If you like photography and have a hack spirit, as almost every BSD enthusiast, you probably have already tried to join two or three pictures together to make a panoramic image. If you haven't yet you probably can guess that this is possible, don't you? What about Google Street View, do you know it?
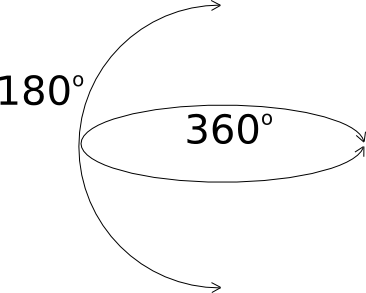
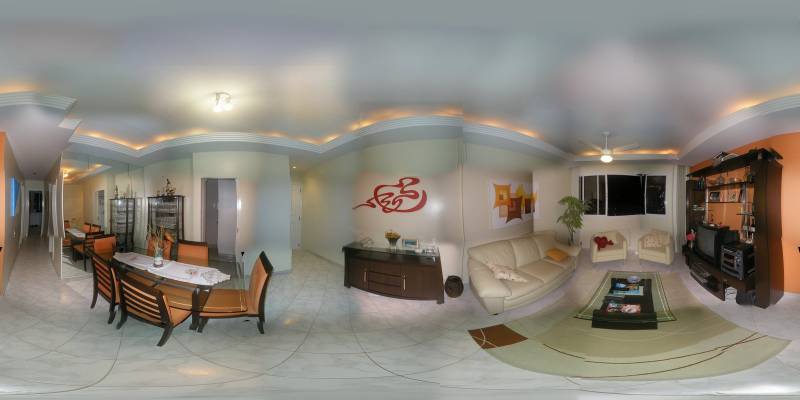
 Well, anyone can guess what is a panoramic image. One possible definition is that it is a picture that extends the lens or the human eye field of view. The most accepted is that it is a question of the field of view degrees, but sometimes it is hard to discover the angle used in a ready made picture, so we finish with the image aspect. Probably it is ok to call any picture with an aspect of 2:1, or wider, a panoramic photo. Most of the times it is achieved by joining pictures together to make a new one with a wider coverage angle. The “immersive” or “360×180°” or “full sphere” or “spherical panorama” is the panoramic picture that extends this to the wider possible angle, covering all visible areas, as shown in Figure 2.
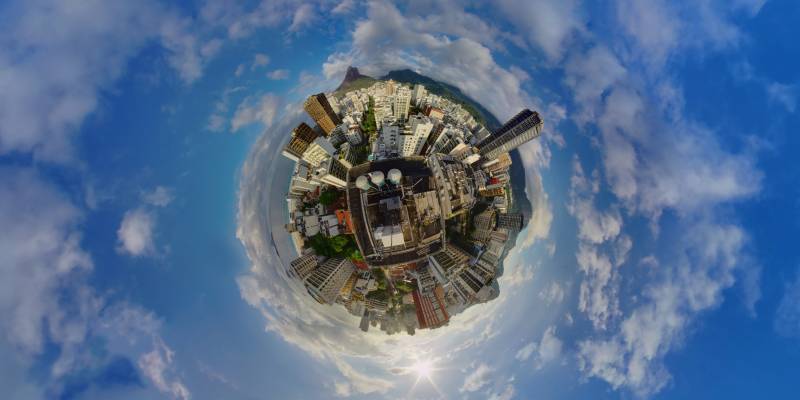
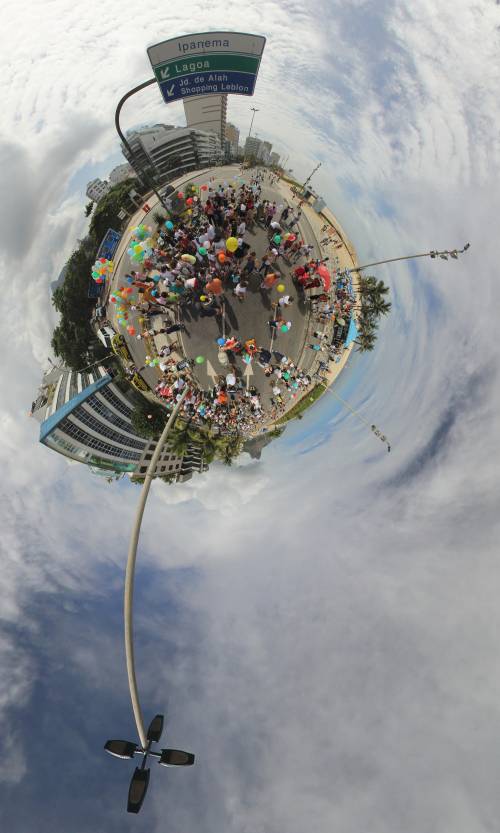
 To see a full sphere picture you will need a specific software or the image will have some distorted parts. The best way to look at them is interactively, in a computer or any other device, preferentially with a big screen. These pictures are usually not very much adequated for printing, although you can convert them to some projections that are better for that, like the equirectangular or stereographic. This last is also called “little planet” in an allusion to the classic “The Little Prince”. Figure 1 shows an image in a stereographic projection.
After this little introduction it is a good idea to have an immersive experience. Follows some links where you can see some of these pictures, and these is only a very small list of them:
* http://www.cartola.org/360/
 - my blog, where I post the images I make and some how-to's. As my native language is Portuguese, there will probably have always more posts in this language than in English. Sorry for that,
* http://www.360cities.net/ - 360×180° pictures community with pictures from all over the world,
* http://www.airpano.net/ - spectacular gallery from a non commercial group of Russian photographers.
Try to experiment everything, clicking and dragging to every side, up and down too, making zoom in and out and so on. Most of the people get really impressed and a good amount gets astonished with this kind of photography, mainly when it is made with high quality. Google street view doesn't care about perfect quality and even this way their images cause a good impression. The possibility to have a point of view as if we were in the place and be able to chose what to look at is really amazing, isn't it?
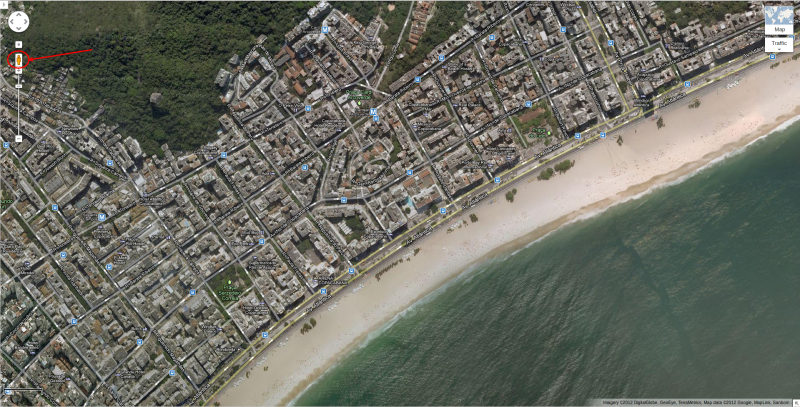
Google Street View is available from the Google Maps((Google Maps, where you can find Google Street View - http://maps.google.com/)) system but they have not shot everywhere yet. Small cities and countries might not have it. With it you can discover the place without going there physically. Try to see some streets in New York, Rio de Janeiro, London or Tokio. It is totally amazing. Probably every BSD user already know how to use it, but anyway, you need to put the map over where you want, click and drag the orange little guy figure over the zoom rule on the left side and release the mouse button when the guy is over some street. The streets with street view available will turn to blue when you start dragging the orange guy. You will need flash plugin to see this.
 By now you can probably imagine all the possibilities of this images: hotel sites, tourism, realstate, restaurants, parks, … Any enterprise or individual that want to show any place can take advantage of this. Even those crazy guys that only what to keep a family memory. Do you think it can be made totally with free software? Surely!
The free softwares available to make panoramic images have existed for some time. Hugin, the main free software I use to stitch my photos, has its first files at sourceforce dated from 2003. And he is only a GUI to other tools, like PanoTools, that already exist before that. The German physician and mathematician Dr. Helmut Dersch has began to make PanoTools in 1998. In 2004 I have made the first Hugin and its dependencies ports to FreeBSD. In 2000 I have participated in a project to build an Internet Brazilian tourism portal that used 360º images to present hotels. It was a big news at that time, but the picture qualities were much poorer than today and also the computer and Internet capacities were inferior, so it was difficult to make higher resolution images. Nowadays it is possible to make images with very high resolution and commercial quality using only free software.
So let’s start talking about the process and free software tools that can be used to make such images. I have already made some speeches and workshops and I usually like to split the process into steps, like this:
* Shooting
* Joining images (stitching)
* Post editing - to correct possible joining imperfections
* Publishing
Each step has its own details and secrets to achieve a good result at the end and I will try to talk a little about each. Before that, however, let me try to show you a simpler process to mount a partial panorama with just a few images.
====== Mounting a simple panorama ======
For a beginner it is surely easier to start mounting a partial panorama. For that you just need some images taken with some overlap between them, like 30 to 50% for example. There is no need of specific cares about the way you shoot and probably also won't have no need of post editing.
Hugin site has a very good English tutorial on it((Hugin tutorial on stitching two pictures together - http://hugin.sourceforge.net/tutorials/two-photos/en.shtml
By now you can probably imagine all the possibilities of this images: hotel sites, tourism, realstate, restaurants, parks, … Any enterprise or individual that want to show any place can take advantage of this. Even those crazy guys that only what to keep a family memory. Do you think it can be made totally with free software? Surely!
The free softwares available to make panoramic images have existed for some time. Hugin, the main free software I use to stitch my photos, has its first files at sourceforce dated from 2003. And he is only a GUI to other tools, like PanoTools, that already exist before that. The German physician and mathematician Dr. Helmut Dersch has began to make PanoTools in 1998. In 2004 I have made the first Hugin and its dependencies ports to FreeBSD. In 2000 I have participated in a project to build an Internet Brazilian tourism portal that used 360º images to present hotels. It was a big news at that time, but the picture qualities were much poorer than today and also the computer and Internet capacities were inferior, so it was difficult to make higher resolution images. Nowadays it is possible to make images with very high resolution and commercial quality using only free software.
So let’s start talking about the process and free software tools that can be used to make such images. I have already made some speeches and workshops and I usually like to split the process into steps, like this:
* Shooting
* Joining images (stitching)
* Post editing - to correct possible joining imperfections
* Publishing
Each step has its own details and secrets to achieve a good result at the end and I will try to talk a little about each. Before that, however, let me try to show you a simpler process to mount a partial panorama with just a few images.
====== Mounting a simple panorama ======
For a beginner it is surely easier to start mounting a partial panorama. For that you just need some images taken with some overlap between them, like 30 to 50% for example. There is no need of specific cares about the way you shoot and probably also won't have no need of post editing.
Hugin site has a very good English tutorial on it((Hugin tutorial on stitching two pictures together - http://hugin.sourceforge.net/tutorials/two-photos/en.shtml)). By doing this step one can have a first contact with the tool and start recognizing it's menus and tabs. The good aspect of the tutorial is that it teaches you how to do the steps manually. It is not so important when stitching just two pictures, but can be necessary to join a full sphere panorama, so it is a good way to start learning to do a full sphere.
====== Mounting a complete panorama - Step 1. Shooting ======
First of all we need to take the pictures (obviously). It is possible to use any camera to do a spherical panorama, but it is highly recommended that it has “Manual Mode” and that you use a panoramic tripod head in a tripod. It is also possible to make it not using all this, but it can put the newbie in such a difficult situation that he might give up without been able to finish his first panorama. Without the manual mode the color and luminosity difference between images will be very difficult to solve, although yet possible. One will also have a hard time to correct parallax errors without using an adequated tripod head. Nevertheless, my very first stitch had all this problems – and it never had a good final quality. It is shown in Figure 4. It has been made with a common point and shoot camera (Olympus C-120) using a common tripod and automatic mode. I have made 42 pictures to cover the full sphere. It is easy to see each original picture in the final stitched image.
 For the beginners I strongly recommend making the previous step, mounting a simple panorama to get used with Hugin. Patience will certainly be of great value in your learning journey, cause mounting a complete sphere panorama can take some time. If you are going to try to shoot without a tripod, some important tips are:
* turn using the machine as the rotation axis and not you, as shown in Figure 5,
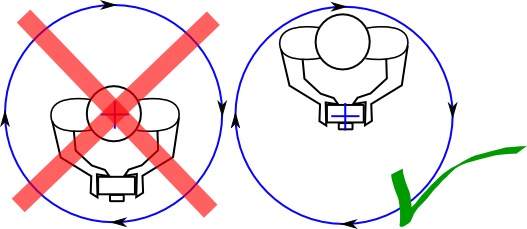 * overlap image pairs using a more or less 30% (1/3) factor,
* choose a scene with less “human lines” or “expected lines”: prefer abstract nature than city,
* choose a scene with the subject as far as possible.
Those tips will make your first try much easier. Using a tripod would make it easy? Yes, but the best would be using a tripod with an appropriated head for panoramic shooting. Rotate the camera around the No Parallax Point makes a huge difference in the stitching step and it can be made using this tripod head I mentioned.
There are many models of panoramic tripod heads and you can even make your own one at home. There is a page in the Panotools Wiki((Panoramic Tripod Heads - http://wiki.panotools.org/Heads
* overlap image pairs using a more or less 30% (1/3) factor,
* choose a scene with less “human lines” or “expected lines”: prefer abstract nature than city,
* choose a scene with the subject as far as possible.
Those tips will make your first try much easier. Using a tripod would make it easy? Yes, but the best would be using a tripod with an appropriated head for panoramic shooting. Rotate the camera around the No Parallax Point makes a huge difference in the stitching step and it can be made using this tripod head I mentioned.
There are many models of panoramic tripod heads and you can even make your own one at home. There is a page in the Panotools Wiki((Panoramic Tripod Heads - http://wiki.panotools.org/Heads)) that shows many commercial models of them and also many home made ones in the section called “Self Made”.
But who in hell is this guy called No Parallax Point? Even if you can't buy or make your own panoramic head, it can help a lot if you know where he is. This will decrease the perspective errors, usually called parallax errors, making it easy to stitch and decreasing the need for post editing.
===== No Parallax Point =====
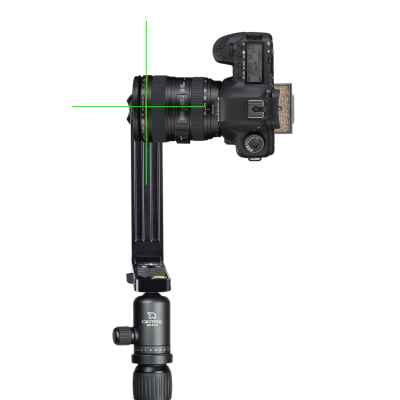
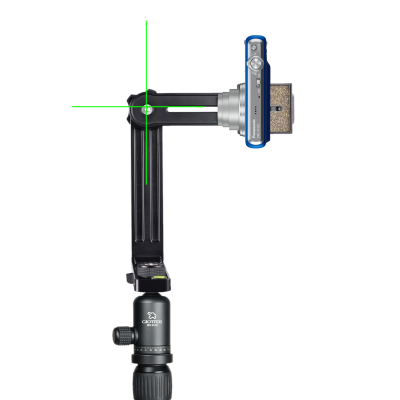
In a few words it is the point that, if used as the axis for rotating the camera, won't cause any perspective errors between the objects in the scene. Usually it is located in front of the camera, many times in the middle of the lens. In Figures 9 and 10 we can see some examples of panoramic tripod head being used to turn the camera using the no parallax point (NPP).
The No Parallax Point is sometimes confused((Photography misconceptions: nodal point - http://toothwalker.org/optics/misconceptions.html#m6)) with the Nodal Point((Nodal Point - http://en.wikipedia.org/wiki/Nodal_point#Nodal_points)), which is an optical concept and not necessarily is the same point where one would be able to shoot pictures with no parallax errors((Paper about the pivot point - http://web.archive.org/web/20060513074042/http://doug.kerr.home.att.net/pumpkin/Pivot_Point.pdf)). Well, what I want to tell you here is that there is one special point where you can put the rotation axis of the camera and this way you will be able to take pictures rotating the cameras and have no parallax problems. And what is a parallax problem?
|  |
| 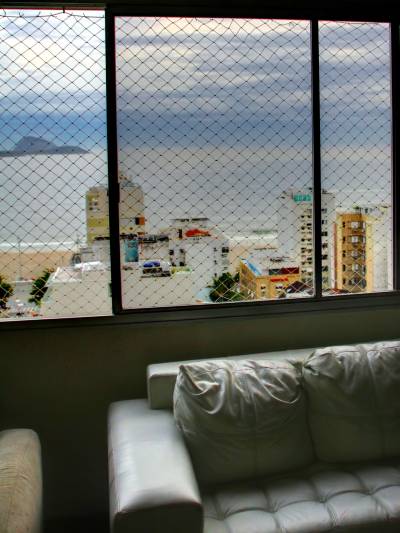 |
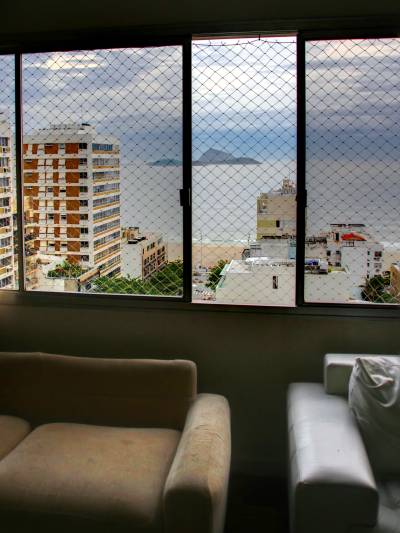
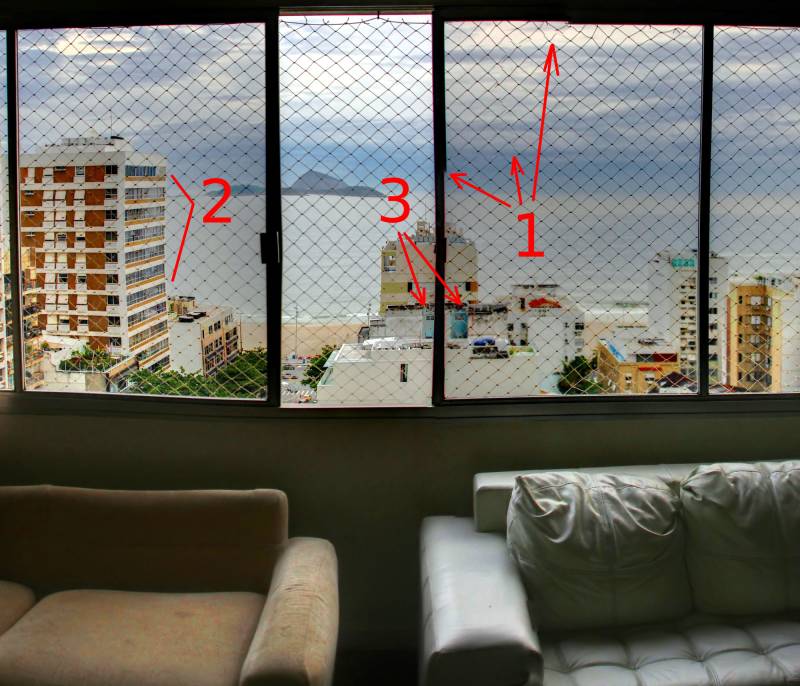
Between Figures 6 and 7 it is possible to see a parallax problem. Notice how the big difference of position between elements like the island and the window, the buildings and the window and so on. An object that was behind the other can be seen in the next picture. The relative position between objects changes as we rotate. The resulting image will have probably some problems. In Figure 8 I tried to joing the two pictures. We can see lines not joining (1), a building that got distorted (2) probably to make it possible to join another part of the image and an object showing twice (3).
If we use an appropriated tripod head and rotate the camera around the NPP the objects would be exatcly in the same relative position, making it much easier to stitch pictures then.
 And how do we use the NPP? In Figures 9 and 10 we can see two different cameras using a professional tripod head that allows allows horizontal and vertical rotation using the NPP allowing a full sphere shooting. The rotation axis is marked by the green line. The PanoTools Wiki((Panorama Tools Wiki - http://wiki.panotools.org/
)), which is a great panoramic reference, has an article about tripod heads((Tripod Heads - http://wiki.panotools.org/Heads)).
|  |
|  |
Besides a lot of commercial models we can also see some “Self Made” heads, where two of mine are also listed. I am also making a tutorial for a simple self made head very efficient((A simplified self made tripod head model - http://wp.me/P1AGa0-gS
|
Besides a lot of commercial models we can also see some “Self Made” heads, where two of mine are also listed. I am also making a tutorial for a simple self made head very efficient((A simplified self made tripod head model - http://wp.me/P1AGa0-gS)). By the time of this writing it was only in Portuguese, but the many images there can give you a good idea of the suggested ideas of simplification.
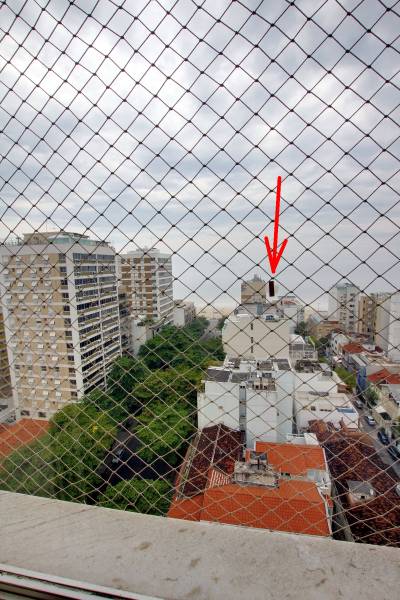
It is important to find the NPP of your camera+lens and for this it is necessary to follow some steps. One very interesting method is the tape on the window. In figures 11 and 12 we can se two images showing a tape fixed in the glass of a window.
|  |
| 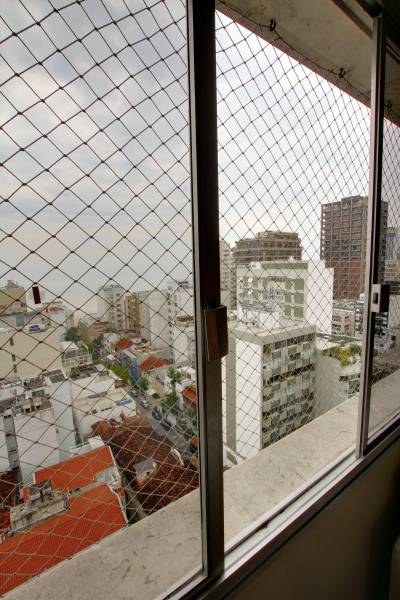 |
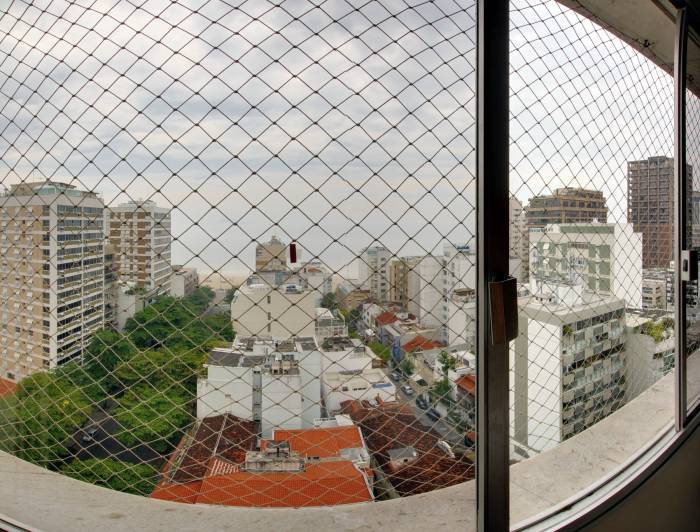
The camera is not perfectly positioned in the NPP, as we can see by the small different position of the tape in relation to the buildings behind. However, the position is already good enough to reduce drastically the parallax errors in a final stitched image. Look at the result in Figure 13.
 There are some very good references about setting the NPP, like the John Panos site((How to find the No Parallax Point - http://www.johnhpanos.com/epcalib.htm
)). It can take some time to set it up, but it is something that you can do only once. There is also a database of already known camera+lens at the PanoTools wiki((NPP/Entrance Pupil Database - http://wiki.panotools.org/Entrance_Pupil_Database)). For updated references besides other not shown here refer to my blog reference page((Reference page at Cartola's blog - http://cartola.org/360/en/reference-links/)).
===== Image Treatment =====
Yet in the photography phase I would include the image treatment. Almost all picture can be improved in an image editor and the full sphere panoramic images usually can take advantages of some techniques like HDR, noise reduction, color correction, exposure fusion, focus stack and others. Here are some free software tools I would recommend, not all of them directly available for BSDs. Specifically the “Neatimage” has a linux version that runs easily with linux emulation under my FreeBSD.
* UFRaw((UFRaw: Raw treatment software - http://ufraw.sourceforge.net/)), RawTherapee((Raw Therapee: Raw treatment software - http://www.rawtherapee.com/)) or Darktable((Darktable: Raw treatment software and photography workflow application - http://www.darktable.org/))
If you don't know what a raw image format is you can just ignore it and work with the JPG, jumping this topic. These are free softwares that will make the initial RAW treatment in case you have shoot in RAW format. This image format is available in many cameras and is capable of storing much more information than the traditional JPG format, allowing more flexibility in the image treatment process. These three are available for installing from the FreeBSD port system. In NetBSD packages you will find the UFRaw as a GIMP plugin or you can try the FreeBSD ports on it. Some other softwares are able to deal with raw format, like Shotwell((Picture organizer - http://yorba.org/shotwell/)). I just didn't list it above because it has limited edition capabilities, beeing more a picture organizer.
* GIMP((This article has been published in the BSD Magazine, January 2013 edition. Here is the link to a local copy I keep. You better read the PDF, that has been reviewed by the editors and I didn't update the article here yet. If and when I do this I remove this message and at that time probably the text will be more complete than the PDF as I won't resist to extend it a little more.
If you need to contact me for any reason, my email adress is 
In this article I am going to show you what 360×180° panoramic photography is along with a few of its possible applications. I hope I can show you how fascinating it is. Panoramic photography is one of the most complete ways of experiencing a location without physically visiting. That is one of the reasons why it is also called “Immersive Photography”. In the following sections I hope I can inspire you to try it out with tools available under a BSD or any Unix like system, using only free open source software.
What you will learn
- what 360×180° panoramic photography is,
- how to start making your own panoramic photographs,
- the main tips and tricks to transition completely to 360×180°.
What you should know
- know how to use GIMP1) Probably a well known tool for many of the BSD world. The GIMP is, in a few words, the free software alternative for Photoshop. It is an image editor. With it we can make most of the image improvements like color, luminosity, focus and many more. As an old and mature tool it is available for all most famous BSD flavors, including DragonFly BSD. * Neatimage2). To put your image in its format you need the cubic images I mentioned when I talked about post editing. Once you have them you need to convert each cube face to two resolutions, one with 1024×1024 pixels and other with 480×480 pixels. You need to give them the correct names and put them in the correct directory. Inside the file that we download with the software there is a small text file with all the instructions needed. You will have to do something like this: * download and unpack the vr5 pano viewer, * take your cube faces and convert them, for example, with the convert command from ImageMagick: * supposing you generated the six cube faces with names like: cubic0000.tif, cubic0001.tif, cubic0002.tif, cubic0003.tif, cubic0004.tif, cubic0005.tif, generated by nona, foreach i (0 1 2 3 4 5) convert -resize 1024 cubic000$i.tif 1024_$i.jpg convert -resize 480 cubic000$i.tif 480_$i.jpg end after these commands you will have the files: 1024_0.jpg, 1024_1.jpg, 1024_2.jpg, 1024_3.jpg, 1024_4.jpg, 1024_5.jpg and 480_0.jpg, 480_1.jpg, 480_2.jpg, 480_3.jpg, 480_4.jpg, 480_5.jpg * put all those twelve converted files in the directory vr_files/cube_faces from the vr5 unpacked files * put the whole vr5 thing in a subdirectory below your panorama, where you have put the flash version, for example, create a directory called “entrance”, * edit the file “entrance/vr_files/config.js * put a title in the variable “vrTitle”, like: var vrTitle = 'Palestra V Gnugraf - 18/08/2012';, * put an alternative path to be shown in non iThing devices in the variable “flashPage”, like: var flashPage = '../index.html'; * if you followed the example, creating the index.html for the flash version and putting the vr5 in a subdirectory, then the variable flashPage gets exactly like shown above. That's all folks! You need now to point your panorama link to the “entrance” folder and the vr5 will detect iThings. If it is being accessed by one of those or not it will know what to do and the panorama will be shown correctly! ====== Summary ====== I hope I have been able to show you a brief of the many aspects of the full sphere panoramic photography and how to make it under a BSD system. As I have mentioned there are plenty of ways to achieve the final result and this is just one approach. That said you can, obviously be free to try other ways, but the big steps will not change very much: * you will take your pictures, * you will maybe treat your images, * you will mount the panorama (stitching it), * you will make adjusts (or not), * you will publish it (or not). Each step has its secrets to success. The one I consider the most critical is the stitching step. It is where, in my opinion, you can get in more different troubles and don't know how to solve it. The Hugin mailing list3)
))
This is a very good noise reduction tool. It is not opensource, but has a free version that deals with JPG images and is available for Linux, Mac and even Windows! As I have said, I run the Linux version with no problems in my FreeBSD desktop. In Figure 14 a closeup in a section of an example image with much noise. It used ISO 6400 and with higher ISO values the noise gets stronger. In Figure 15 the same section treated with Neat Image.
|  |
|  |
|  |
* ImageMagick((ImageMagick - Convert, Edit, and Compose Images. A very powerful and mature command line tool set to manipulate images - http://www.imagemagick.org/
|
* ImageMagick((ImageMagick - Convert, Edit, and Compose Images. A very powerful and mature command line tool set to manipulate images - http://www.imagemagick.org/))
What to say about ImageMagick? It can make almost everything with images in the command line. It is a very mature and powerful set of image tools to do many many things related to pictures. Here I mention it as an alternative tool to use as noise reduction filter. It can take a little more time to calibrate the parameters to use, but, as in panoramas we use many similar images, it can save you much more time using it in a script to process all the panorama images in the same way, as it needs to be done. I have tested the commands suggested in the ISONOISE script done by Fred((Fred's ImageMagick Scripts: ISONOISE - http://www.fmwconcepts.com/imagemagick/isonoise/index.php)). The suggested command sequence is:
convert $infile -median $radius $tmp0
convert $infile $tmp0 -compose Difference -composite -threshold $thresh% $tmp1
convert $infile $tmp0 $tmp1 -compose src -composite $outfile
You must change $tmp0 and $tmp1 to temporary file names, $infile and $outfile for the the input and output files and $radius and $thresh% with the radius and threshold values. Those last two are the ones you change until achieve the result desired. Notice that the parameters used as variables are ready to be used in a shell script or you can also download the ready made script from Fred's mentioned site, of course. Notice, however, that they are bash scripts prepared to use bash installed at /bin/bash and bash is not installed by default on BSD systems. I got the result shown in Figure 16 with a radius of 30 and a threshold of 0% using the commands directly, not the script (it made difference as the script doesn't do exactly those commands). Watching the pictures in a larger size in my computer I consider the resulting image using ImageMagick better than the one using Neat Image, but it can vary from image to image. Other tries can be made with the approaches done by Fred in his scripts called noisecleaner, denoise, statsfilt or others.
* Enfuse((Enfuse: exposure fusion tool - http://enblend.sourceforge.net/))
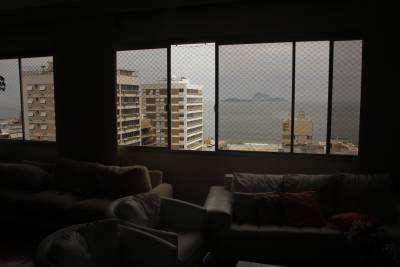
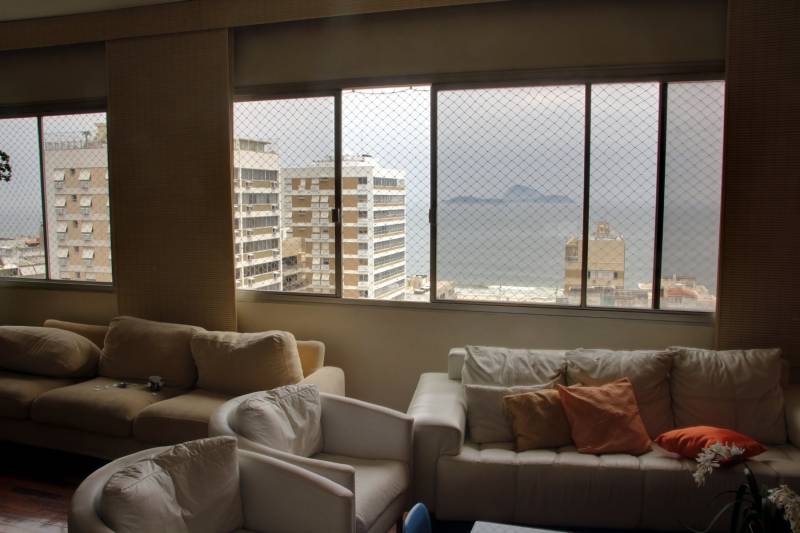
This tool is able to make exposure fusion. Imagine a scene where the contrast is too high. In Figures 17 and 18, for example, I took a picture inside a living room with daylight outside. It is really difficult to make one only picture showing at the same time the details of the dark and the light parts of the scene. To solve this problem we can take pictures with different expositions and combine them with Enfuse. At the end we will have a picture showing good details in all areas, like I did in Figure 19. In full sphere panoramas the chances to have areas with different lights are obviously higher.
|  |
|  |
|
|
|  |
In the following table the result of a searching I have made of the avaiability of those tools in the most known BSD systems.
| Application| DragonFly BSD| FreeBSD| NetBSD| OpenBSD |
| UFRaw| GIMP plugin| YES| GIMP plugin| YES |
| Raw Therapee| NO| YES| From FreeBSD| NO |
| Darktable| YES| YES| From FreeBSD| YES |
| GIMP| YES| YES| YES| YES |
| Enfuse| YES| YES (within enblend)| YES| YES |
====== Mounting a complete panorama - Step 2. Joining images (Stitching) ======
After all image treatment is over it is finally time to join the pictures and make the panorama. The tool for this is Hugin((Hugin stitching software - http://hugin.sf.net/
|
In the following table the result of a searching I have made of the avaiability of those tools in the most known BSD systems.
| Application| DragonFly BSD| FreeBSD| NetBSD| OpenBSD |
| UFRaw| GIMP plugin| YES| GIMP plugin| YES |
| Raw Therapee| NO| YES| From FreeBSD| NO |
| Darktable| YES| YES| From FreeBSD| YES |
| GIMP| YES| YES| YES| YES |
| Enfuse| YES| YES (within enblend)| YES| YES |
====== Mounting a complete panorama - Step 2. Joining images (Stitching) ======
After all image treatment is over it is finally time to join the pictures and make the panorama. The tool for this is Hugin((Hugin stitching software - http://hugin.sf.net/)). It will do all the distortion, rotation and position job to make a perfect stitch with our images.
The stitching is probably the hardest part of making a full sphere panorama. It can be made in many different ways, even considering only the use of one tool, and there are many tools for it. Any way you choose to do it can lead you into some problems and to solve many of the possible problems you will need to understand some concepts understand better the tool used.
I will try to talk first about the automatic process, then will give you some hints to try to use a partial automatic process. The most guaranteed, although, is the manual process, but it will surely take more of your precious time. Take a chance to read the many tutorials available at Hugin's site and also all over the Internet.
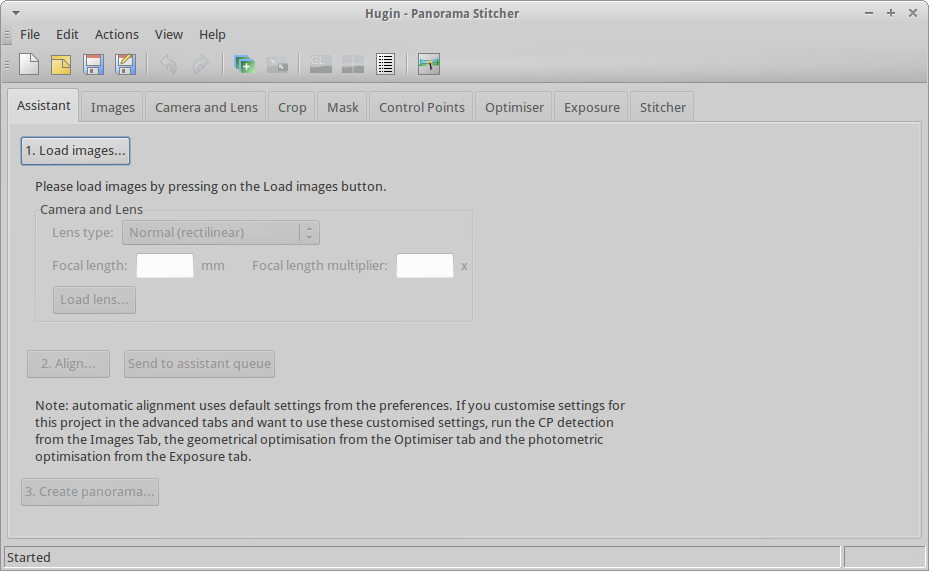 We can use the tool with it's automatic wizard or we can use more manual steps and take control of what it does. Each choice has it's price. The automatic can fail to find common points between images or to align the panorama and the manual way is a little complex, which means that you will need some time to learn some concepts and try a lot before get experienced.
The wizard is available in the first tab, shown in Figure 20. To use the automatic way We need to press only three buttons to finish the panorama, generating a final equirectangular tiff image. For this automatic process to work it is very important that the pictures were very well done, with enough overlap and preferably using the NPP.
So you can try the three buttons:
- Load images…
- Align…
- Create panorama…
If you are lucky you can then jump to the step where I suggest how you can visualize the immersive panorama, at the end of this section.
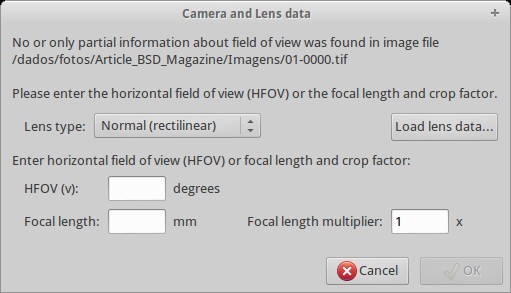
Depending on your camera, the loading images step can show you a window to fill some values about your lens and sensor. It won't happen if your camera already writes those values in the image file, but if not, the window on Figure 21 will popup. It is not very important to fill it correctly. The optimization steps will find the better values. One very important thing to set is the lens type. Be sure to set it to fisheye (any) or stereographic if you are using a fisheye lens or keep it with “Normal (rectilinear)” if you are using a normal lens, otherwise the optimization will fail, automatically and manually. If you don't know the other values, just keep “1” in the “Focal lenght multiplier”, fill a reasonable angle in the “HFOV”, which should be the horizontal field of view of your lens in angles and the “Focal length” will be calculated.
 If the automatic way fails we can try the manual, but before that there are a couple of things you can still try to make the automatic work. One first hint is to try to stitch one horizontal line of images first. Then you can insert other lines in next steps. Some scenes can be harder to stitch, like those made with narrow lens that can have images without visible common points. Also very hard are the images with moving objects, like clouds, trees in the wind, moving people and so on.
A second try to make the automatic work is to generate the called “key files” before aligning. The generation of each image “Control Points Candidates” is a high memory consumer process. The strategy is to save this information in files, so the step is done before trying to match Control Points between images. To do that, first load your images and save the Hugin project file. After that, open a command line. Supposing you are in a BSD system, do this in your csh/tcsh:
foreach i (`jot 10 0`)
cpfind -k $i project.pto
end
This commands suppose you have 10 images in your file and the Hugin file is called project.pto. That jot command will generate ten numbers starting at zero and the foreach will make a loop until the end. Adjust the steps to your case or simply run cpfind -k N project.pto for N between zero and the number of your images minus one. After that try again the automatic process.
Going to the manual mode, the first step is to find common points between images. Those are called Control Points or just CPs. To find them it is mandatory that we had overlapped a little each image pair. If you did this, now it is time to show Hugin that, for example, that little rock in one image is the same as the rock in the other image. Using these CPs Hugin will be able to distort, roll and position the images to stitch the panorama. Some manual steps have been shown in the tutorial mentioned in section “Mounting a simple panorama”. That tutorial lacks some other important concepts, so here follows some hints to add manual control points:
* there are normal CPs, vertical line CPs, horizontal line CPs and lines((Hugin tutorial on creating architectural projection - a good reference for creating vertical lines - http://hugin.sourceforge.net/tutorials/architectural/
If the automatic way fails we can try the manual, but before that there are a couple of things you can still try to make the automatic work. One first hint is to try to stitch one horizontal line of images first. Then you can insert other lines in next steps. Some scenes can be harder to stitch, like those made with narrow lens that can have images without visible common points. Also very hard are the images with moving objects, like clouds, trees in the wind, moving people and so on.
A second try to make the automatic work is to generate the called “key files” before aligning. The generation of each image “Control Points Candidates” is a high memory consumer process. The strategy is to save this information in files, so the step is done before trying to match Control Points between images. To do that, first load your images and save the Hugin project file. After that, open a command line. Supposing you are in a BSD system, do this in your csh/tcsh:
foreach i (`jot 10 0`)
cpfind -k $i project.pto
end
This commands suppose you have 10 images in your file and the Hugin file is called project.pto. That jot command will generate ten numbers starting at zero and the foreach will make a loop until the end. Adjust the steps to your case or simply run cpfind -k N project.pto for N between zero and the number of your images minus one. After that try again the automatic process.
Going to the manual mode, the first step is to find common points between images. Those are called Control Points or just CPs. To find them it is mandatory that we had overlapped a little each image pair. If you did this, now it is time to show Hugin that, for example, that little rock in one image is the same as the rock in the other image. Using these CPs Hugin will be able to distort, roll and position the images to stitch the panorama. Some manual steps have been shown in the tutorial mentioned in section “Mounting a simple panorama”. That tutorial lacks some other important concepts, so here follows some hints to add manual control points:
* there are normal CPs, vertical line CPs, horizontal line CPs and lines((Hugin tutorial on creating architectural projection - a good reference for creating vertical lines - http://hugin.sourceforge.net/tutorials/architectural/)),
* the most important are the normal ones, the ones you set between two images that overlap,
* the lines are set in only one image, putting it in both sides of the panel, like in Figure 23,
* set at least 2 CPs between each image pair: I usually like to set 3 and the automatic process usually set around 20,
* add CPs distant one from another: I try to put one in the top, one in the middle and another one in the bottom of each overlap of two side by side images,
* don't set CPs over moving objects like leaves, clouds and people, among others,
* add at least one horizontal or vertical line at each two images: this is not something you must do, but will help to level the panorama.
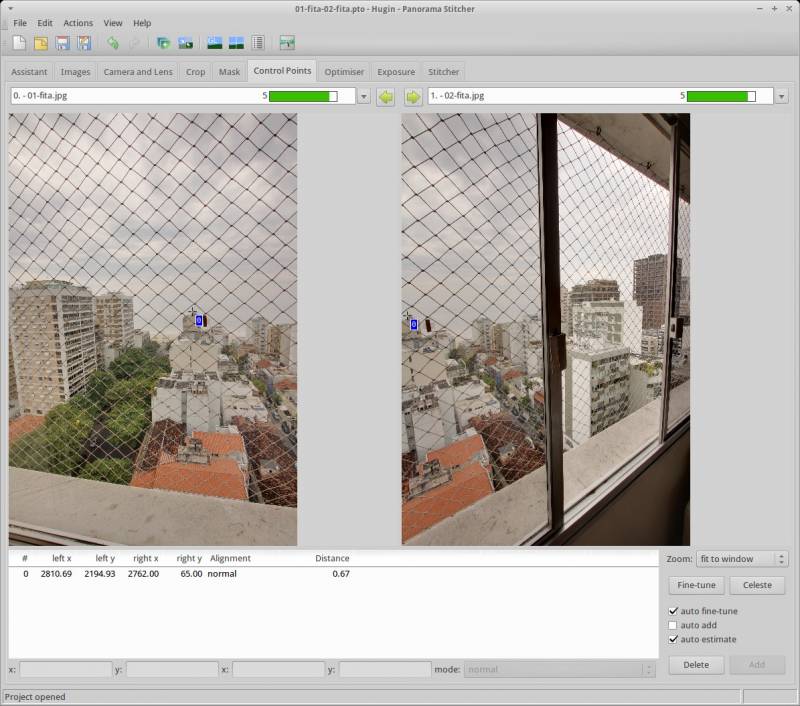
In Figure 22 we can see the “Control Points” tab with a normal CP. Notice that it is set between two images. We put one image in the left and another in the right to add this CP. I have set more CPs between those images, but have shown only one in the picture to simplify.
 To set normal CPs:
* choose the “Control Points” tab,
* choose one image in the left panel and the next image in the right panel
* optionally unset the options “auto fine-tune” and “auto estimate” (i like to unset them),
* try to look at a good candidate to a control point and click on it in one of the images (any of them),
* the software will zoom in the clicked image so you can optionally reposition the point,
* click on the correspondent point in the other image,
* the software will zoom in the other image too, so you can reposition the second point,
* optionally click the “Fine-tune” button or use the “f” keyboard shortcut to make an automatic fine adjustment,
* click the “Add” button or use the “a” keyboard shortcut.
Notice in Figure 22 the point defined by the small blue rectangle with a zero inside. This is the CP number. Right beside it there is a small cross, which is the specific place where the CP is located.
Set more CPs until you have the desired number of them between the two images. Remember to set at least two and to make them far from each other. You can navigate to the next pair of images using the small green arrow between the image names. Don't forget to close the circle making CPs between the last and the first image.
About the other type of CPs, in Figure 23 we can see a line CP. Remember math classes? A line is defined by two points. To set a line we put the same image in the left and right panel and add the two points that define it. In Figure 23 there is one point of the line in the upper part of the window and another in the lower part.
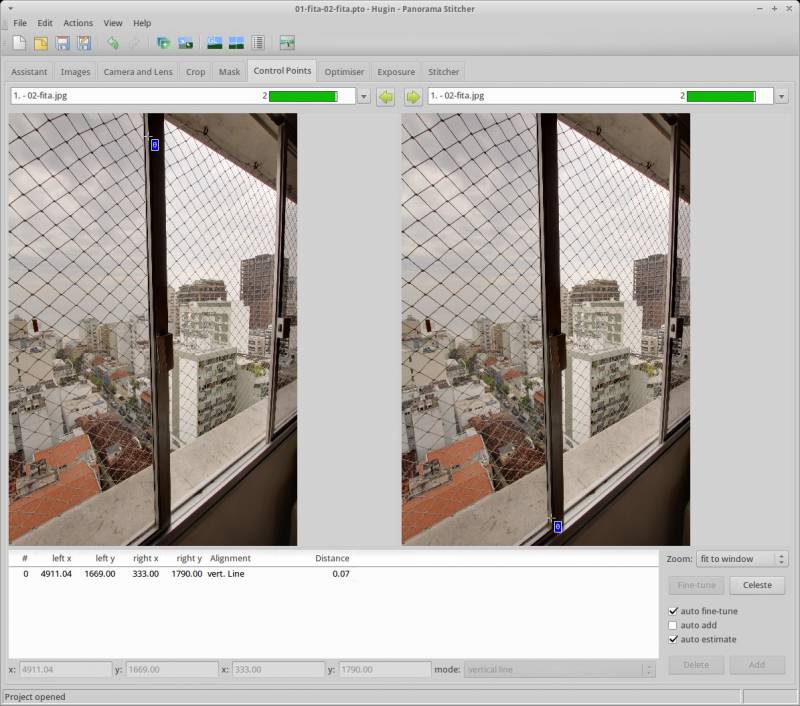 Usually I set vertical lines at each two or 3 images. In a 10 images set, for example, you can try to set around 5 vertical lines. Sometimes it is not possible, because there is no vertical line. In nature pictures, for example, it happens. You can then try horizontal lines or don't use it at all, leveling the panorama by hand after optimizing it. I will show it in a while.
After setting up the CPs it is time to “Optimize”. This is the process in which the tool makes many interactions to distort, roll and reposition images until the Control Points are positioned as good as possible. This means that a point, represented in one image, must be positioned right over the same point represented in the other image. Usually it is impossible to make all points get perfectly positioned with its pair. The measurement to see if the optimization went well is the maximum and average CPs distance. The utopian case would give us 0 distance for all CPs.
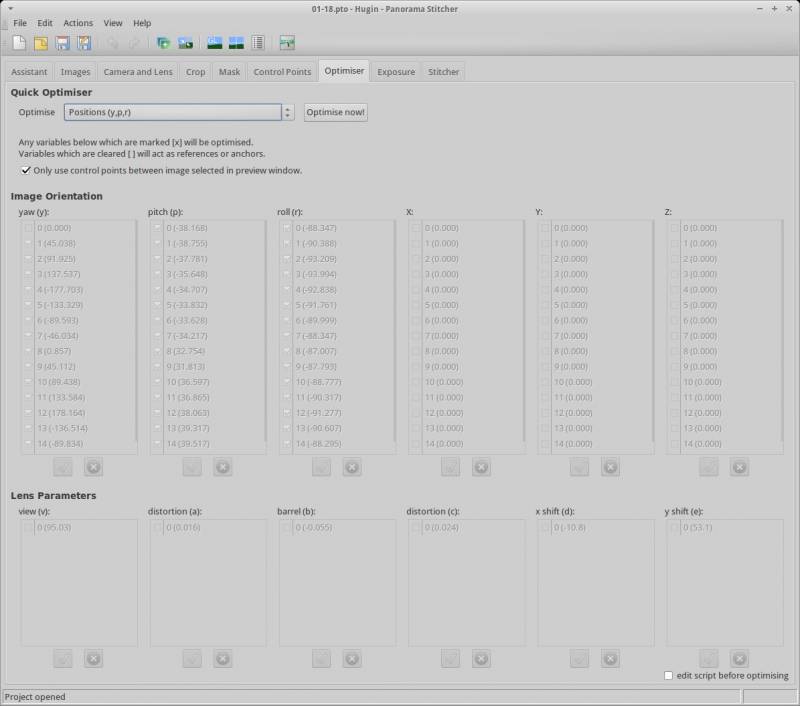
The “Optimizer” tab is shown in Figure 24. I usually do my optimizations in three steps. In any optimization the program takes the actual positions and distortions and try to change the requested parameters to achieve a better result. It means that it is a good idea to save the project without any optimization, so, if you want to try a different approach you just reopen the file. The following are the steps that I use in most cases.
First I ask it to change only “Positions (y,p,r)”. Those are angular positions: yaw, pitch and roll. It changes the images positions around the sphere of the visual area.
 After optimizing positions, usually the result is not the best. The average and maximum CPs distance are still too high, but I accept them in the confirmation dialog, like the one in Figure 25. It shows a very good result for a first position optimization. After this first step the values can be much higher, like hundreds of points in the maximum distance.
As a second step I optimize “Positions and view (y,p,r,v)” and accept the result again.
The final optimization is “Everything without translation”. If I try this last option first, usually the result is something really crazy.
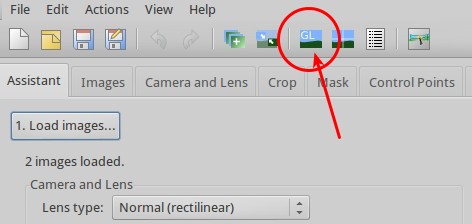
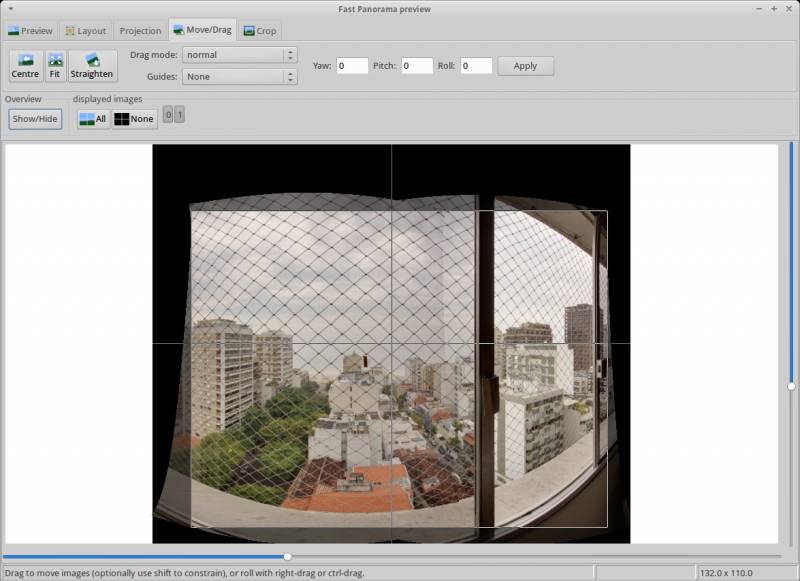
 After optimization it is a good idea to check the “Fast panorama preview window”, what we do by clicking the little blue and green button shown in Figure 26 and the window shown in Figure 27 shows up. The “Fast preview” window is not only to look at the panorama, we can make some adjusts on the resulting image.
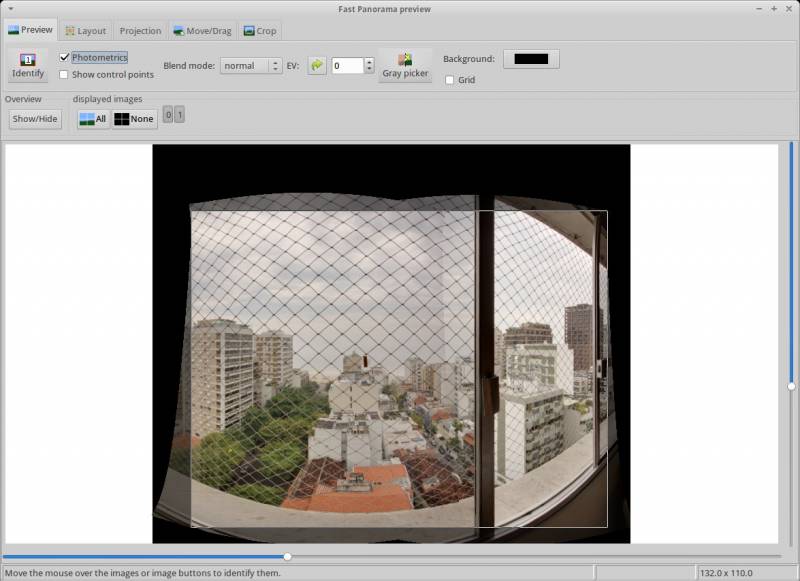 Notice the tabs, each one with a specific purpose. Specifically the “Move/Drag” tab, shown in Figure 28, is important to manually level the panorama as I have mentioned. Using it you just click and drag over one picture and the others, that are connected to it by the CPs, move according to your needs. Other buttons can be very useful for partial panoramas, like the “Center” and “Fit”. The “Straighten” button will make a try to level the panorama. You can also test it and use Ctrl+Z if it fails.
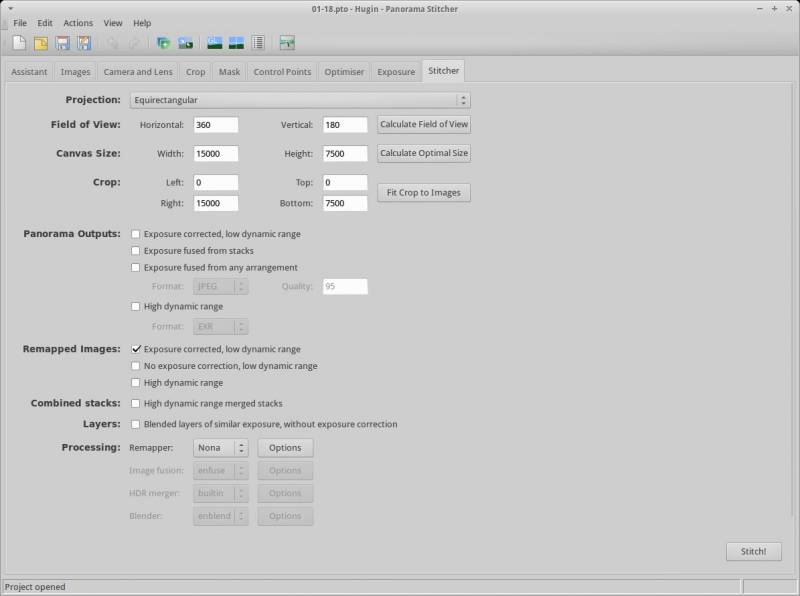
 After optimizing it is time to generate the final image. Sometimes it is still interesting to make some adjusts using masks, reviewing bad CPs, setting up lines and re-optimize. When the result is good enough we go to the Stitcher, shown in Figure 29. The hints for this tab are:
* the “Equirectangular” projection is the most common and we will use it,
* use the “Calculate Optimal Size” to have the better resolution of the final image,
* chose your preferred output format from TIFF, JPG or PNG,
* if you want each individual image distorted and replaced to make adjusts in an image editor, choose “Remapped Images” and in “Nona” options unset “Save cropped images”
 Choosed your options, just click in the “Stitch!” button and voila! … well, it is probably going to take some time to Hugin to finish your image, just be a little patient and watch the progress. In fact it is also a good idea to save the file before stitching.
That ready made image can be viewed interactively with viewers like Panini((Panini panorama viewer - https://sourceforge.net/projects/pvqt/
Choosed your options, just click in the “Stitch!” button and voila! … well, it is probably going to take some time to Hugin to finish your image, just be a little patient and watch the progress. In fact it is also a good idea to save the file before stitching.
That ready made image can be viewed interactively with viewers like Panini((Panini panorama viewer - https://sourceforge.net/projects/pvqt/)) before being published. It is necessary to compile it under BSDs, but it is not difficult. You just need to install some qt4 dependencies and follow the instructions in the panini-build.txt file.
You can try to find other options here: http://wiki.panotools.org/Panorama_Viewers#Stand_alone_Viewers or you can jump to the publishing section.
====== The little planet format ======
Well, there are many little planets in the article, so I think I must talk about them. They are a very interesting format of the full sphere panoramas. In fact they are a specific projection, as already said, that is one of the most interesting to get your panorama printed.
To do them I prefer to finish the equirectangular and even the final corrections, mentioned in the next section Post editing. Then you come back to Hugin, and that is why I am talking about it here.
- load the final equirectangular panorama as the only image in Hugin,
- configure the lens as an equirectangular with a 360 HFOV,
- go to the “Stitcher” tab and configure the projection to “Stereographic”,
- go to the “Fast preview panorama” window and change to the “Move/Drag” tab, as shown in Figure 28,
- put 90 as the “Pitch” value, as shown in Figure 30, then click the “Apply” button,
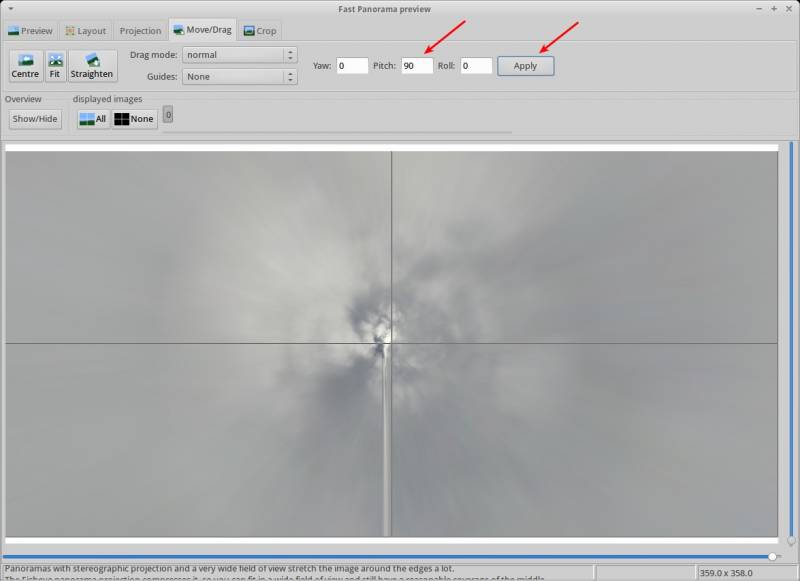
- adjust the zoom with the horizontal scroll shown in Figure 31, arrow number 1,
- don't ming with lines like the one shown in Figure 31 arrow 2, cause they are only present in the fast preview, the rendered image won't have it,
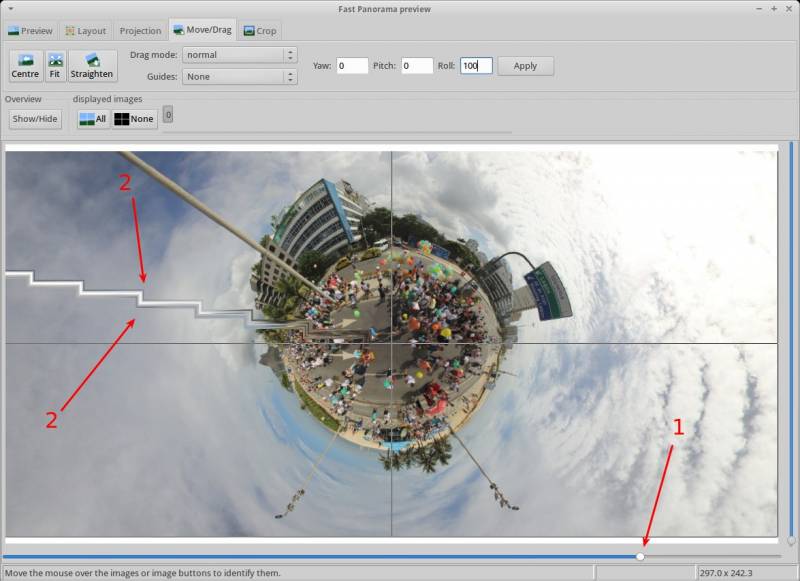
- finish the final positioning by dragging and moving the picture, then you can stitch as you have stitched before: choose your image size and stitch it!
Et Voilá, one more little planet in the planet!
 ====== Mounting a complete panorama - Step 3. Post editing ======
Even after adjusts made in Hugin probably other corrections are still necessary to make the final image perfect. Some not well joined lines, half parts of objects and people and removing the tripod image are good examples of things that can need more work. It is possible to do this job in some different ways, but all of them implies the use of an image editor like GIMP. It is curious how the best tricks to make these corrections are the same used to do some virtual plastic surgery. I have learned them searching for tutorials on making people thicker, removing pimples and acne or things like that. “Extreme makeup” is also a good thing to search, just add “GIMP” or your favorite image editor to the search terms. I expect that you already know the basics of GIMP and there are plenty of material and tutorials out there, so I will only mention the main tools I use, which are:
- clone,
- healing,
- bend,
- copy and paste a feathered selection then move and/or rotate it,
- IWarp filter (inside “Distort” filters).
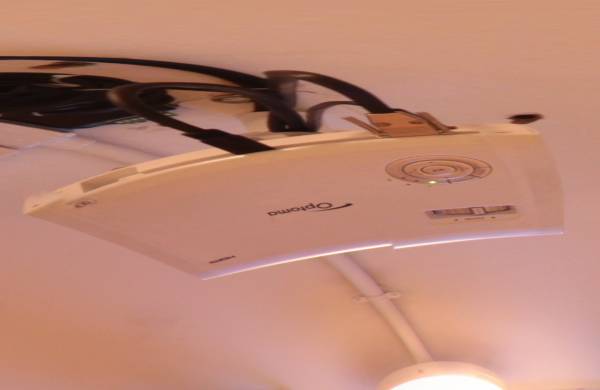
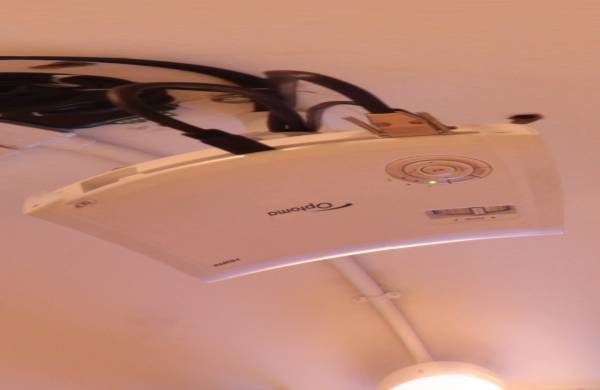
They will enable you to make a bent line straight or to cut a little part of the image and paste it in another place making the joints smooth. The equirectangular image allow us to correct many problems in the vertical central area of the picture. Even in some distorted places it is still possible to correct errors, like the one shown in Figures 33 and corrected in Figure 34.
 Closer to the vertical extremes of the equirectangular the distortions make it impossible to do those corrections. One of the least obvious tricks is used to edit the nadir point of view. The equirectangular image does not allow we to edit it at all, nor the zenith.
One alternative using Hugin is:
- load the equirectangular into Hugin,
- pitch it 90 degrees in the fast preview window,
- generate a new image to edit into GIMP and then do the steps back.
I sometimes prefer to use another tool, in fact it is a tool kit called Panotools::Script((Bruno Postle's Panotools::Script toolkit - http://search.cpan.org/dist/Panotools-Script/)) made by Bruno Postle. It is a perl package available at CPAN: http://search.cpan.org/dist/Panotools-Script/. When installed it gives us two tools, among others: erect2cubic and cubic2erect. These two guys, as their names suggest, make the conversion from equirectangular and cubic format in both ways. The installation can make you a little tired, as it will need many other CPAN perl packages dependencies installation.
In the cubic format we have 6 separated images, as shown in Figure 35. You can think of them as if they were the 6 faces from a cube with you inside. Each image is in a rectilinear format, with no distortion. Straight lines are straight on them. This format finally allows we to edit the zenith and nadir views easily and you can take the opportunity to put some logo or message at the nadir. After finished you can convert it back to equirectangular with the cubic2erect tool.
 The erect2cubic can be used like this:
erect2cubic –ptofile=cubic.pto –erect=yourEquirectangular.jpg
You just replace the name yourEquirectangular.jpg with the name of your equirectangular file and give the PTO file the name you want. I suggested cubic.pto. After that you can run:
nona -o cubic cubic.pto
nona is a command that comes with Hugin and in this case will output the 6 remapped images, that correspond to the 6 cube faces. In this example it will give us 6 files named cubic0000.tif, cubic0001.tif, cubic0002.tif, cubic0003.tif, cubic0004.tif and cubic0005.tif. The nadir file is the last one and the zenith is the cubic0004.tif. You can edit any of them and the command to come back to equirectangular would be:
cubic2erect cubic0000.tif cubic0001.tif cubic0002.tif cubic0003.tif cubic0004.tif cubic0005.tif newEquirectangular.tif
Panini is capable of loading the cube faces to show you the interactive panorama and Panotools::Script comes with many other tools that can automate the panorama generation outside Hugin, using the command line or a script. Cool, isn't it?
====== Mounting a complete panorama - Step 4. Publishing ======
To finally show the world your precious art it is necessary to publish it at the Internet. Here I am going to show you two ways of doing this: one using a site where everybody can publish full sphere panoramas and a second way, publishing it in your own site.
===== Publishing on a Ready Made Site =====
The easiest way to publish is using the site 360 Cities((360 Cities: immersive panorama gallery to watch and publish - http://www.360cities.net
The erect2cubic can be used like this:
erect2cubic –ptofile=cubic.pto –erect=yourEquirectangular.jpg
You just replace the name yourEquirectangular.jpg with the name of your equirectangular file and give the PTO file the name you want. I suggested cubic.pto. After that you can run:
nona -o cubic cubic.pto
nona is a command that comes with Hugin and in this case will output the 6 remapped images, that correspond to the 6 cube faces. In this example it will give us 6 files named cubic0000.tif, cubic0001.tif, cubic0002.tif, cubic0003.tif, cubic0004.tif and cubic0005.tif. The nadir file is the last one and the zenith is the cubic0004.tif. You can edit any of them and the command to come back to equirectangular would be:
cubic2erect cubic0000.tif cubic0001.tif cubic0002.tif cubic0003.tif cubic0004.tif cubic0005.tif newEquirectangular.tif
Panini is capable of loading the cube faces to show you the interactive panorama and Panotools::Script comes with many other tools that can automate the panorama generation outside Hugin, using the command line or a script. Cool, isn't it?
====== Mounting a complete panorama - Step 4. Publishing ======
To finally show the world your precious art it is necessary to publish it at the Internet. Here I am going to show you two ways of doing this: one using a site where everybody can publish full sphere panoramas and a second way, publishing it in your own site.
===== Publishing on a Ready Made Site =====
The easiest way to publish is using the site 360 Cities((360 Cities: immersive panorama gallery to watch and publish - http://www.360cities.net)), shown in figure 36. You just need to do a free registration and upload the equirectangular image. It will take a short time for it to be approved, probably one day or so. To increase the chances of approval you should make an image with at least 6,000 x 3,000 pixels and fill the fields that describe the picture, including its local in google maps. If you are lucky your picture can be selected to Google Earth's 360 cities gallery.
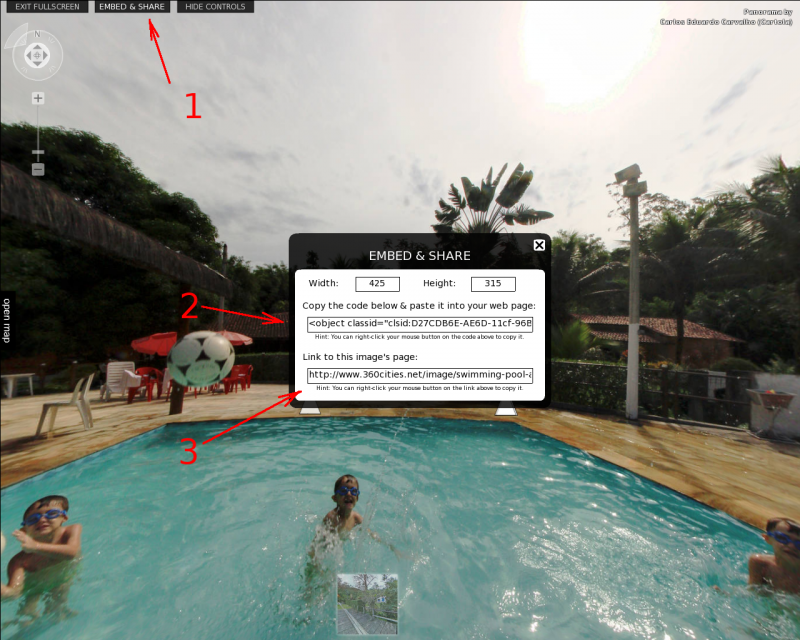
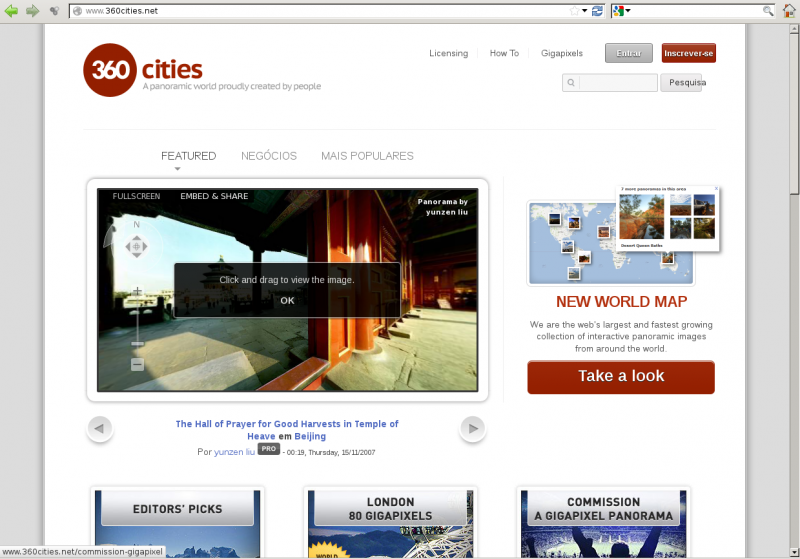 It is possible to embed the picture published in 360 Cities in your own site, you just need to use the tags they give at the panorama visualization. You need to use the “EMBED & SHARE” button, seen in Figure 37 arrow 1. Then you must agree with the non commercial terms and a new window opens. After it you need to copy either the code to embed the panorama in your site, seen in arrow 2 in Figure 37, or the link to refer to it, seen in arrow three in Figure 37.
 I know that the TourWrist((TourWrist - yet another site to publish your panoramas - http://www.tourwrist.com/
)) site is another alternative, where maybe you will be able to publish less quality panoramas. I know they allow you to publish partial panoramas and they have an application for Apple devices.
===== Publishing on Your Own Site =====
To publish by yourself you can use, for example, flash, java and html5 formats and put the panorama in your own site. Among the free options, I prefer the Salado Player((Salado Player: a free flash plugin to play a 360×180° image - http://panozona.com/wiki/SaladoPlayer:Quick_start)) for flash enabled devices and VR5 pano viewer((VR5 pano viewer: a free HTML5 code to publish a 360×180° image - http://www.vrhabitat.com/#vr5)) for the iThings and other HTML5 browsers. Pannellum((Pannellum: a free HTML5 code to publish a 360×180° image - https://bitbucket.org/mpetroff/pannellum/)) is also a new option for HTML5. The java plugin, PTViewer((PTViewer: a free java plugin to publish a 360×180° image - http://webuser.hs-furtwangen.de/~dersch/)), made by the notorious Helmut Dersch((Helmut Dersch - pioneer Panoramatools developer - http://webuser.hs-furtwangen.de/~dersch/)), is heavier, has fewer features and won't be able to deal with very large images. It will accept the equirectangular format directly, and in fact only it. That makes publishing much easier, but is one of the reasons of the image size limit. At his site there are other newer alternatives, which you can take a look, but I haven't tested them yet.
Talking about the ones I prefer, to use the Salado Player we need to convert the image as a first step. This is done using Salado Converter((Salado Converter: converts images to use with Salado Player - http://panozona.com/wiki/SaladoConverter)), a small Java software that does the job. It transforms the equirectangular into a “DeepZoomCubic” format, which a recommend.
So, the first step is to download Salado Converter and uncompress it in some directory in your machine. After that you will have a file called SaladoConverter.jar. You might have to increase the java heap size to work with larger images, so I recommend using this command line to call it:
java -jar -Xmx3g SaladoConverter.jar
This will use 3 gigabytes of memory for the JVM heap size. To guarantee that it will work you can use as much as your computer has available. The program will then start with a window like the one shown in Figure 38.
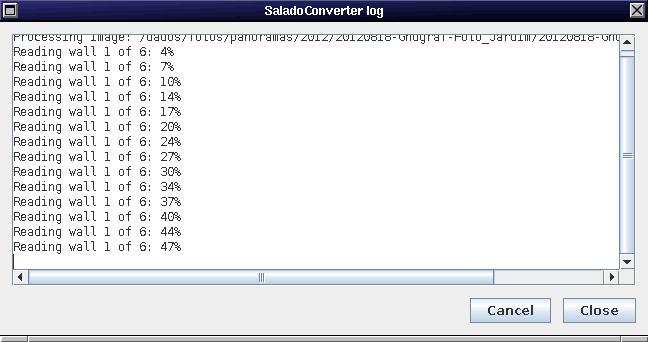
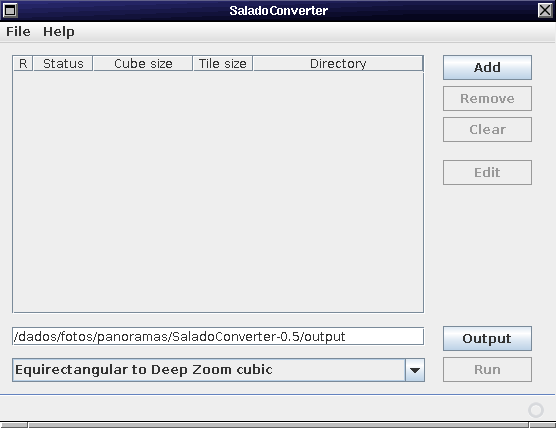 Then you just need to add your image using the Add button and then the Run one. If everything is ok it will open another window, like the one from Figure 39, showing the conversion progress. The image is converted into 6 walls, corresponding to each cube face. It shows also the percent progression of one by one until the end. When it finishes, this second window gets closed. The output will be in the output directory that was set on the tool. Usually it creates a sub directory below “output”, with the same name of the image a dz_ in front of it. The dz means “deep zoom”.
 If you get an error you can try to decrease your equirectangular image size or increase the memory used. The image size limit which you will be able to work with will depend on the amount of memory available in your hardware.
Inside the dz output directory there will be many sub folders and files, but we don't need to deal with them separately. We just need to deal with the complete dz folder.
After converting the image it is necessary to configure the Salado Player XML file to point to the dz directory. The XML file has many other possible configurations. We can put a background sound, hotspots, video, links to other panoramas and other things. The Salado Player site gives complete information on configuring the XML. After creating the first XML you can then use it as a template for your next panoramas. You can also take a template from my blog, searching for a panorama where I have used Salado Player. Every panorama I publish has a “Technical datasheet” with all tools I have used, besides other information.
Let me try to show it in practice. Download a recent example can be found in this link:
http://cartola.org/panoramas/20120818-Gnugraf-Palestra/index.html
You will need this first HTML to point to the XML and other files. After downloading it you must edit it in your favorite text editor (what about vi?) changing:
- the title text between <title> and </title> tags,
- put the name of your XML file in place of bn.xml (or use it as your file name).
Then you will need the XML file. Download it from:
http://cartola.org/panoramas/20120818-Gnugraf-Palestra/bn.xml
and then:
* change the file name to your desired file name,
* edit it in changing:
* “dz_equi04/equi04_f.xml” to the name of the “*_f.xml” file in your “dz_” directory,
* erasing the section between “<ImageButton” and “</ImageButton>” tags, which is my logo and link to my site home page.
Notice that this HTML and XML files will expect that you have the Salado Player in the same directory. More specifically, they expect a directory called SaladoPlayer-1.0 and another called embed. Notice also that this sample files are still using version 1.0 of Salado Player. As long as I have tested, changing to a newer version implies only in changing the path names. I tested the 1.1 version, but at the time of this writing the latest one was 1.3 and has some new features, like dynamic moving lens flare effect.
Another way of doing less configuration is to use always the same image name. The dz directory gets the image name as it's suffix and this complete name is what you need to put in the XML file. If you use always the same template and the same image name you can do no configuration at all and put each of your panorama in a different folder to get organized.
I don't have one, but if you want your panoramas to be seen by as many people as possible another thing to do is to make your panorama compatible with apple devices. The free tool I use for this is the VR5 pano viewer(()) is a very good place to ask for help and I am there also. For the beginner the stitching of bad images can be hard, so the stitching step depends of well done pictures. I am not talking about beautiful pictures, I am talking about using the No Parallax Point to make them, which, remember, makes a huge difference in the easiness of stitching a full sphere panorama. Also remember the recommendations of a good scene selection.
Many more information and many other concepts can be studied and I hope this article can catch your interest to the subject, making you search for more and become one more panoramist photographer in the world! Particularly in the BSD world and also in all the free software community I hope we can maybe find more people to help the free softwares to evolute and become each time better.
====== Glossary ======
Exif
Exchangeable image file format is a standard that specifies the formats for images, sound, and ancillary tags used by digital cameras and other devices. Take a look at the Wikipedia for more detailed information: http://en.wikipedia.org/wiki/Exif.
ExposureIt can be understood by the total density of light allowed to fall on the sensor during the taking of a photograph. More informatin here: http://en.wikipedia.org/wiki/Exposure_%28photography%29''. No Parallax Point
is the point where an imaginary rotation axis passes and one should rotate the camera+lens through this axis in order to obtain no parallax errors between different shoots. Nadir
is the direction pointing directly below a particular location. In the case of a full sphere panorama, is the point you see when you look down. In general there are tips and tricks concerning shooting the nadir point to make an full sphere panorama. Zenith
is the imaginary point directly above a particular location. In the case of a full sphere panorama, is the point you see when you look up in the vertical direction. ====== References ====== <references/>
