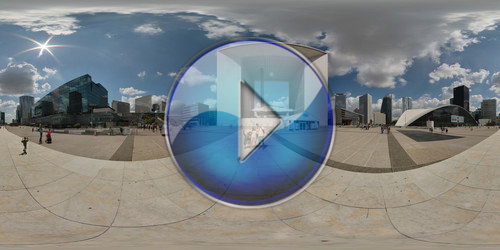
The Grande Arche at La Défense (pronounced [la de.fɑ̃s]) represents an open window to the world. Inaugurated in 1989, as a tribute to the bicentenary of the French Revolution, its amazing architecture is really impressive. Imagine how it would be to work in a building with this shape. Yes, it is not a sculpture! It is a commercial building!
The place is at a neighborhood called La Défense, which is nothing less than the commercial center of Paris and the biggest business center developed at Europe. 20.000 people live there and a total of 150.000 work there daily. It is located at the occidental extreme of the city, along the Axe Historique, that begins at The Louvre, at the center of Paris, and continue to the Champs-Élysées, through the Arc de Triomphe, until reach La Défense.
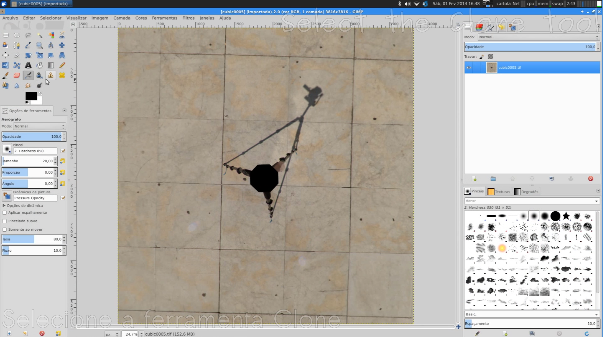
in many advanced image editors there is a tool called “clone”. It is a very good option to correct the hole at the nadir (the down view) in a panoramic image of the full visual sphere. You know that hole left by the tripod, its legs and possible shadow? Well, it uses to be a pain for the beginner. At this small video I try to call your attention to this possibility in a real panorama I’ve made and that’s going to be my next published picture here at the blog.
At the start, the video shows the panorama navigation using Panini, with which I’ve opened the equirectangular projection. It is also capable of opening the cube faces.
I’ve decided to show at the video only the cloning phase to correct the nadir. Besides this it is also necessary that you know:
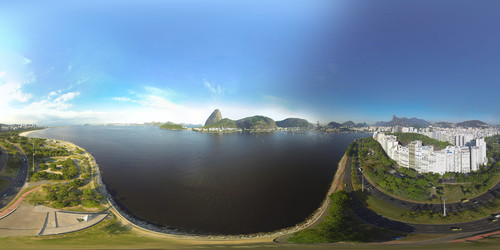
This place reminds me when I was a child and used to go there with my parents to ride my bike and play with our dogs. The “Aterro do Flamengo” has been built with many successive embankments over the Guanabara bay since the beginning of the XX century until late 50’s. It is today a big leisure area with many different spaces, monuments, a museum, a marina and a freeway that connects downtown to the south zone of the city.
It is a little strange sometimes to imagine that this part of the city, that for me has always been there, once didn’t exist and has been created by men over the bay. I’ve already done other 360º pictures there, at the Monumento aos Pracinhas, Maman sculpture, that was exposed close to the Modern Art Museum (MAM) and at the statue of Marechal Deodoro, creator of the Brazilian Republic .
This picture has been shot over the Estácio de Sá monument, an obelisk, called pyramid by some, that nowadays hosts some photography exhibitions in it’s underground. Estácio de Sá has been a Portuguese military, founder of the city of Rio de Janeiro. Cousin of Salvador Correia de Sá and nephew of Mem de Sá, other important people from the Brazilian history, he came to the city of Salvador, in Bahia, in 1563, with the mission to expel definitely the remaining French at the Guanabara bay and found here a new city. In 1565, after accomplish his duty, he finally founded the city of São Sebastião do Rio de Janeiro, our Wonderful City!
At this picture I tried to play a little, shooting in the morning and then in the late afternoon. It is possible to change the panorama whenever you want by clicking at the Sugar Loaf or Corcovado icons, and you will see the sun mooving from one to the other, going to it’s corresponding position in the morning and afternoon.
As the places has many many beautiful scenes I decided, once more, to put an image album over the immersive picture, giving the user a chance to know a little bit more from the place.
Aterro do Flamengo
Technical Datasheet
This is a place I wanted to shoot since a long time ago. I went there in the morning, but not too early. Maybe if I went earlier the sky color would be better, more yellow or orange, but I’m not sure if the gopro would perform well with less light, I still need to test it. Until now I prefer the aerial pictures shot in the middle of the day, this way the sun is higher and the light gets uniform in all directions, not giving me the problem of the big white sky with the sun closer to the horizon. After stitching the morning picture I thought about coming back at the end of the day to make another. My initial idea was to make one only panorama mixing the two images, getting from the afternoon one only the part of the Sugar Loaf mountain, but after trying this I decided to put both panoramas separated in a tour.
The positioning between the two didn’t get so good, but the problem was the different highs from the shootings that changed very much the overall perspective, making it impossible.
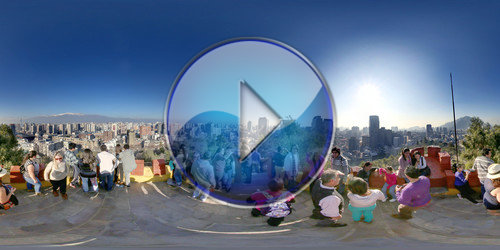
This is a very interesting destiny for the tourist that visits Santiago del Chile. A small hill with almost 230 feet (70m) in the middle of the city, Cerro Santa Lucía provides a beautiful panoramic view. Nothing better to register than an immersive picture. The architecture of the place is also amazing, the kids played like if they were in a castle. After climbing the stairs the reward is the magnificent view of Santiago, with an astonishing blue sky with the Andes behind.
During the climbing there are many good places to take a picture, so I decided to share other images over the panorama in a gallery. Hope you enjoy.
Santiago del Chile, panoramic view from Cerro Santa Lucía
Technical Datasheet:
As I shot hand held with my arm up I decided to put the lens at 8mm instead of my preferred 15mm. This made the stitching easier with only 4 horizontal images, but reduced the zoom possibility. I had also to clone some floor to remove myself from the nadir.
here is one more panoramic picture, this time giving you the opportunity to visit the entrance of the beautiful city of Teresópolis, near Rio de Janeiro, Brazil. This specific place is know as “Soberbo”, which could be translated to superb, and I think you cam understand the reason by watching the immersive photo. The privileged view reaches the Guanabara Bay, at more than 60 miles (100km) away. Closer to the Soberbo is the most famous mountain, called “Dedo de Deus”, which means “God’s Finger”. Many stores and other companies in the city use this name.
The city is well know from those who like tracking and scaling activities, with many different places to visit. The “Pedra do Sino” (Bell’s Rock) is probably the most famous climbing place in the area. For those who like easier workouts, I recommend the Parque Nacional da Serra dos Órgãos, where you can take a walk in nature with a beautiful river.
as usually, sorry for my English, as it is not my native language.
Here I am just going to share my workflow for making a full sphere panoramic picture (a 360º photo) using my quadcopter, a DJI Phanton, with a gopro hero 3.
I don’t have a gimbal. Until now I am using the water case that came with the gopro fixed in the standard support that came with the Phantom.
Another good advise is that a fullshpere panoramic picture can get complex itself, mainly for the ones that never did one, so, if this is your case, you better try to make one made with a more stable support than a quadcopter. You can read this other article I have published before. Notice that without rotating using the axis that passes through the NPP (no parallax point) one can have a lot of parallax errors. Here an equipment that can minimize this problem. Even without it, if you can put the gopro in the vertical and fix it closer to the center of the Phantom it will help.
As a first step I put the gopro looking at 45º down
Set it up to make timelapse with one picture at each 2 seconds and made it start them – this will make many useless pictures, but ok
Flight till the desired point and counted until 3, trying to count 3 seconds
Rotated 45º and counted again until 3, repeating it until finish an horizontal line of pictures
With the camera in the horizontal position and depending on the scene I do another horizontal line of pictures with the camera looking to the horizon (0º)
If the Phantom flies high enough and there is no object at the same high of it, this will probably not be necessary
When I have to do this I put the Phantom down, move the camera and put it up again. This usually generates a lot of parallax problems.
After all (could have been before) I took a picture of the sky from the ground, to stitch with the aerial ones
This kind of shooting can result in a lot of parallax problems that usually can only be removed in a post processing editor like GIMP or other advanced image editor that has tools like clone, healing, different selection tools, rotate selection, move selection, feather selection and maybe a little more features. Here some tips on removing parallax errors in post editing with GIMP.
As the gopro doesn’t have manual exposition, color difference can also appear between images. Usually the stitching software will be able to deal with it, but if doesn’t you can also correct it in an advanced image editor. Feather selections is a key feature for that. I have made a video tutorial here, but unfortunately it is also in Portuguese.
here is one more picture in Carolina. It has more than a year that I’ve been there and still have panoramas to mount. This is the sixth of them. After walking in a small track for about 40 minutes we arrivet at the summit of a small plateau from where we jump using the zipline. The total length of the cable is 1.200 meters (almost 4000 feet). You can get a little afraid before jumping, but it is really cool. Right before jumping I did this panoramic image to try to show a little bit of the sensation and the fantastic view from there.
Immersive panorama from zipline at Pedra Caída - MA, Brazil
Other panoramas in Carolina
View From ChurchKids at the FarmItapecuru FallsTorre da LuaSquare in CarolinaAt the Pool
 The Grande Arche at La Défense (pronounced [la de.fɑ̃s]) represents an open window to the world. Inaugurated in 1989, as a tribute to the bicentenary of the French Revolution, its amazing architecture is really impressive. Imagine how it would be to work in a building with this shape. Yes, it is not a sculpture! It is a commercial building!