Panoramic 360×180º picture near Teresópolis, RJ, Brazil

Hi,

here is one more panoramic picture, this time giving you the opportunity to visit the entrance of the beautiful city of Teresópolis, near Rio de Janeiro, Brazil. This specific place is know as “Soberbo”, which could be translated to superb, and I think you cam understand the reason by watching the immersive photo. The privileged view reaches the Guanabara Bay, at more than 60 miles (100km) away. Closer to the Soberbo is the most famous mountain, called “Dedo de Deus”, which means “God’s Finger”. Many stores and other companies in the city use this name.

The city is well know from those who like tracking and scaling activities, with many different places to visit. The “Pedra do Sino” (Bell’s Rock) is probably the most famous climbing place in the area. For those who like easier workouts, I recommend the Parque Nacional da Serra dos Órgãos, where you can take a walk in nature with a beautiful river.
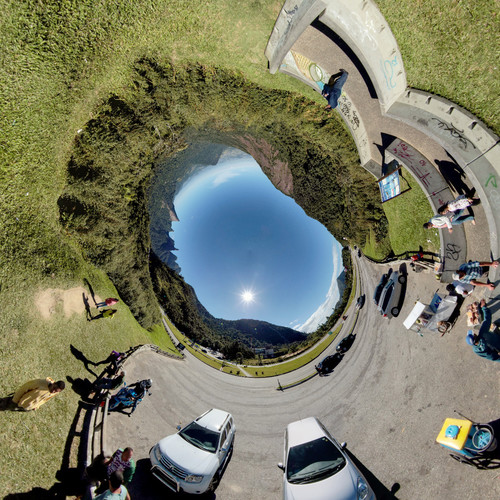
Panorâmica Imersiva no Soberbo, Teresópolis, RJ

Technical Datasheet:

Cheers, Cartola.

My short recipe for making pictures for a fullsphere panorama with the DJI Phantom quadcopter

Hi everybody,

as usually, sorry for my English, as it is not my native language.

Here I am just going to share my workflow for making a full sphere panoramic picture (a 360º photo) using my quadcopter, a DJI Phanton, with a gopro hero 3.

I don’t have a gimbal. Until now I am using the water case that came with the gopro fixed in the standard support that came with the Phantom.

Another good advise is that a fullshpere panoramic picture can get complex itself, mainly for the ones that never did one, so, if this is your case, you better try to make one made with a more stable support than a quadcopter. You can read this other article I have published before. Notice that without rotating using the axis that passes through the NPP (no parallax point) one can have a lot of parallax errors. Here an equipment that can minimize this problem. Even without it, if you can put the gopro in the vertical and fix it closer to the center of the Phantom it will help.

  1. As a first step I put the gopro looking at 45º down
  2. Set it up to make timelapse with one picture at each 2 seconds and made it start them – this will make many useless pictures, but ok
  3. Flight till the desired point and counted until 3, trying to count 3 seconds
  4. Rotated 45º and counted again until 3, repeating it until finish an horizontal line of pictures
    • With the camera in the horizontal position and depending on the scene I do another horizontal line of pictures with the camera looking to the horizon (0º)
    • If the Phantom flies high enough and there is no object at the same high of it, this will probably not be necessary
    • When I have to do this I put the Phantom down, move the camera and put it up again. This usually generates a lot of parallax problems.
  5. After all (could have been before) I took a picture of the sky from the ground, to stitch with the aerial ones

Here are two examples made using this workflow

Notes:

  • This kind of shooting can result in a lot of parallax problems that usually can only be removed in a post processing editor like GIMP or other advanced image editor that has tools like clone, healing, different selection tools, rotate selection, move selection, feather selection and maybe a little more features. Here some tips on removing parallax errors in post editing with GIMP.
  • As the gopro doesn’t have manual exposition, color difference can also appear between images. Usually the stitching software will be able to deal with it, but if doesn’t you can also correct it in an advanced image editor. Feather selections is a key feature for that. I have made a video tutorial here, but unfortunately it is also in Portuguese.


%d bloggers like this: